
얼굴 인식으로 아두이노 LED제어하기
2016-10-27 14:47:46
개요
안녕하세요. 오랜만에 글로 찾아뵙는거 같습니다!
이번에 소개할 프로젝트는 OpenCV를 사용한 프로젝트인데요. OpenCV는 영상처리 쪽에서 많이 쓰이는 라이브러리인건 다들 아실거라 생각합니다.
사실 다른 프로젝트를 기획하고 있다가 잘 되지 않아 급하게 일단 진행사항까지는 작성하려 합니다!
얼굴 인식을 사용한 프로젝트는 예전에 한번 글을 올린적이 있는데요.
얼굴 추적 카메라라 하여 서보모터를 팬, 틸트로 움직여 얼굴에 따라 웹캠이 따라가는 프로젝트입니다.
(얼굴 추적 카메라 - http://kocoafab.cc/make/view/156)
이때 이 프로젝트에 대해 많은 분들이 연락을 주셔서 다시 한번 방법에 대해 소개하고 정리하고자 글을 쓰게 되었습니다.
기존의 프로젝트의 경우에는 32bit사양에 프로세싱을 사용하고 OpenCV의 버전 또한 상당히 구버전이라 환경을 맞추기엔 조건이 까다로웠습니다.
그래서 이번에는 Visual Studio와 64bit환경으로 작성하였습니다.
이런 프로그램의 경우 컴퓨터 환경이 매우 중요하기에 조건이 다를 경우 잘 되지 않을 수 있음을 유의하세요!
설치 환경
| OS | 윈도우7 64bit |
| 프로그램 | Visual Studio 2013 |
| OpenCV 버전 | openCV - 3.1.0 |
※ 위 3가지 조건 중 하나라도 틀릴 경우 제대로 작동이 되지 않을 수 있습니다!
동영상
나중에 찍어서 올리겠습니다!
OpenCV설치하기
OpenCV설치는 Visual Studio가 설치돼있다는 전제 하에 작성하겠습니다.
먼저 OpenCV 홈페이지로 이동 후 OpenCV를 내려받습니다.
OpenCV 사이트 링크 - http://opencv.org/
OpenCV의 버전은 Version 3.1로 받습니다.

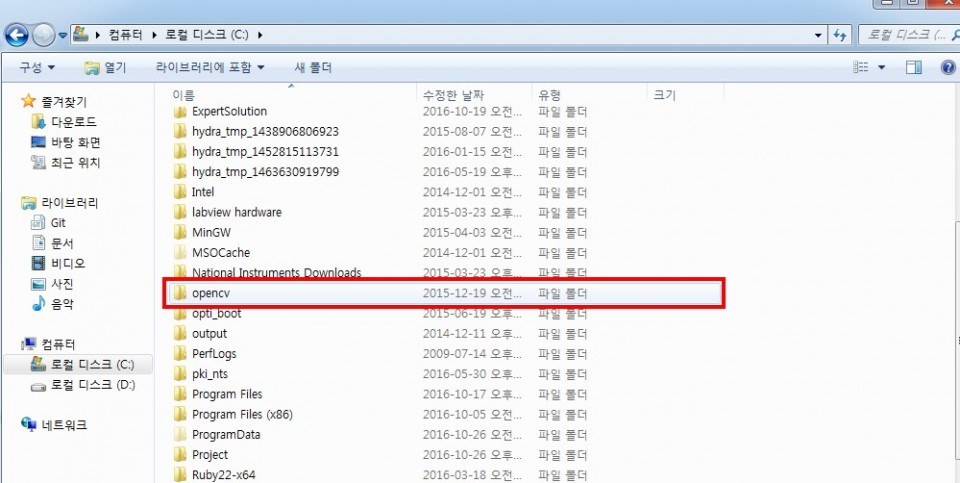
파일을 받으면 아래와 같은 파일이 컴퓨터에 생기는 실행시키고 나면 압축을 해제한 폴더가 나오게 됩니다.
폴더는 어느 위치에 옮겨도 상관없으나 저는 사용하기에 편한 C드라이브로 옮겼습니다.
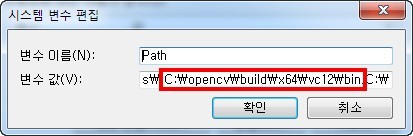
Path지정을 위해 내 컴퓨터 속성 - 고급 시스템 설정 - 고급 탭 클릭 - 환경 변수를 클릭합니다.

시스템 변수 중 Path를 클릭하여 편집합니다.
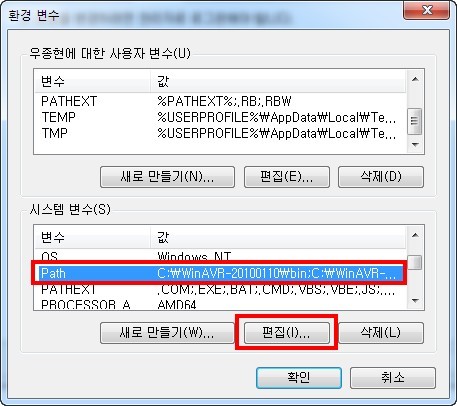
C:\opencv\build\x64\vc12\bin를 변수 값에 추가합니다.
만약 Opencv폴더를 c드라이브가 아닌 다른 디렉토리에 추가했을 겨우 그 디렉토리에 맞게 경로를 작성해야 합니다.
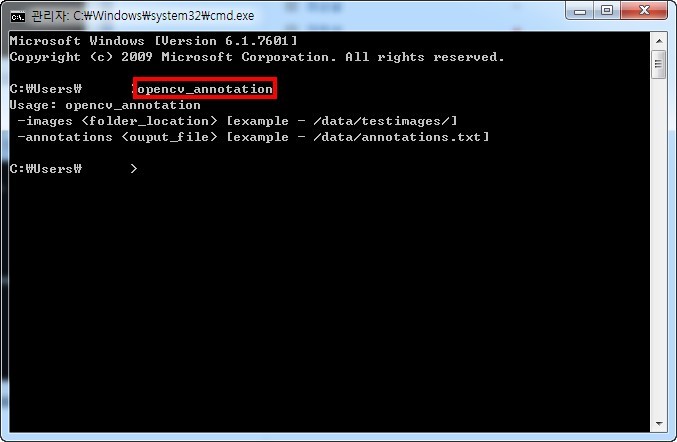
위 작업까지 끝났으면 cmd창을 열어 opencv_annotation을 작성하고 엔터를 눌러 아래처럼 뜨는지 확인합니다.
제대로 설치되었다면 아래와 같은 문구가 뜨게 됩니다.
Visual studio2013 환경 설정하기
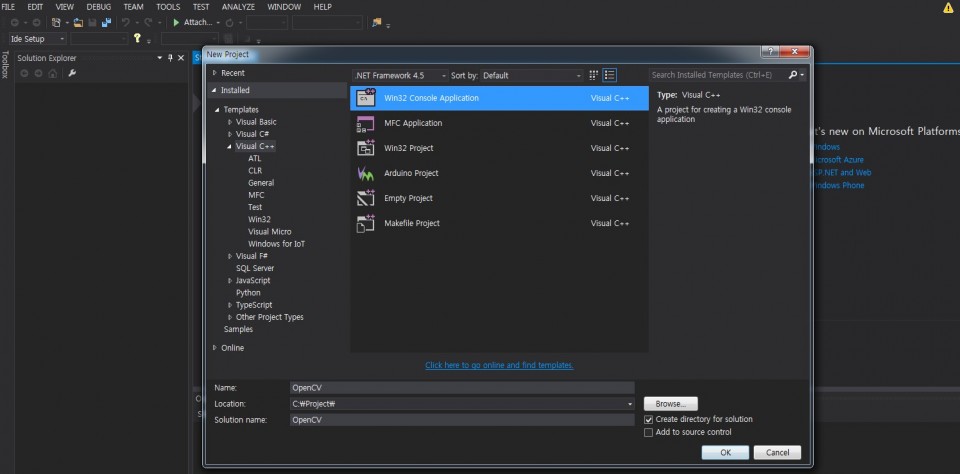
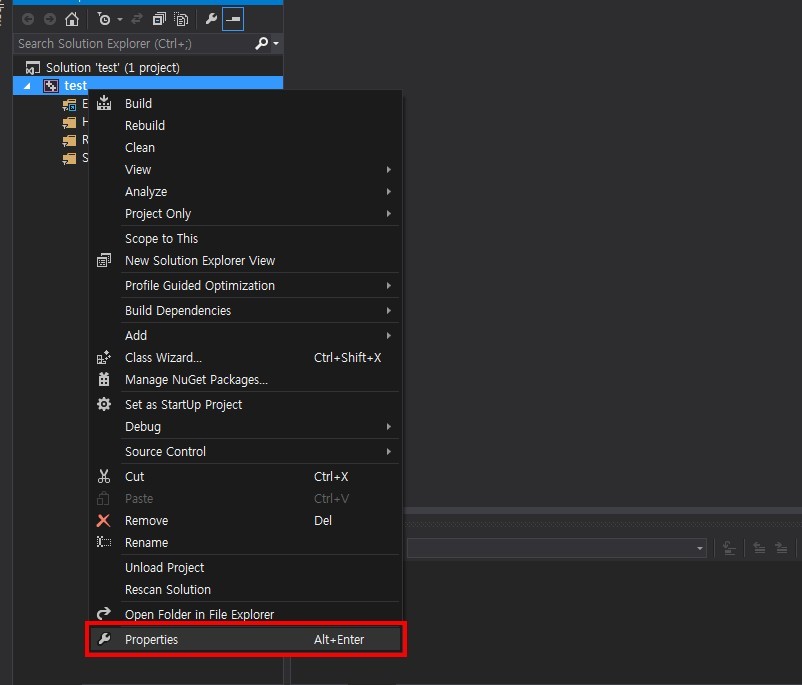
Visual studio에서 새 프로젝트를 생성합니다.
프로젝트의 속성을 클릭합니다.
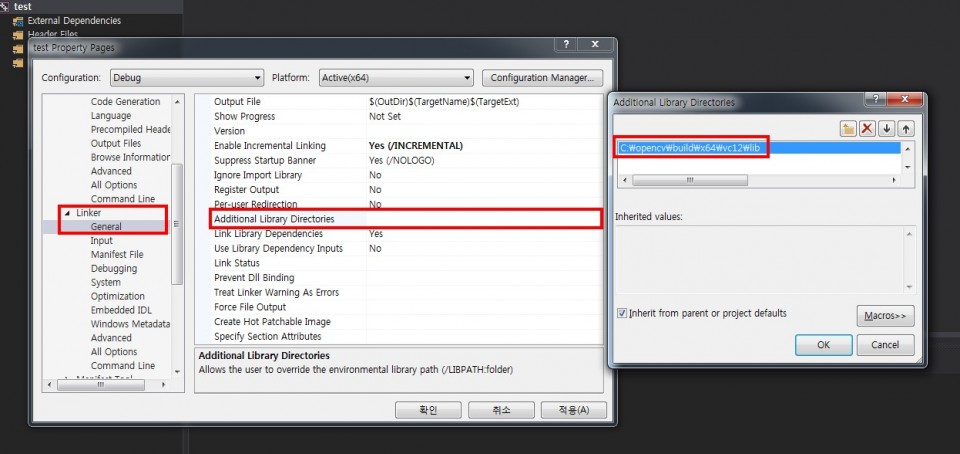
Configuration Manager를 클릭하여 Platform을 x64로 변경해줍니다.

C/C++ - General - Additional Include Directories를 클릭하고 아래 경로를 추가해줍니다.
C:\opencv\build\include

Linker - General - Additional Library Directories에서 아래 경로를 추가합니다.
C:\opencv\build\x64\vc12\lib
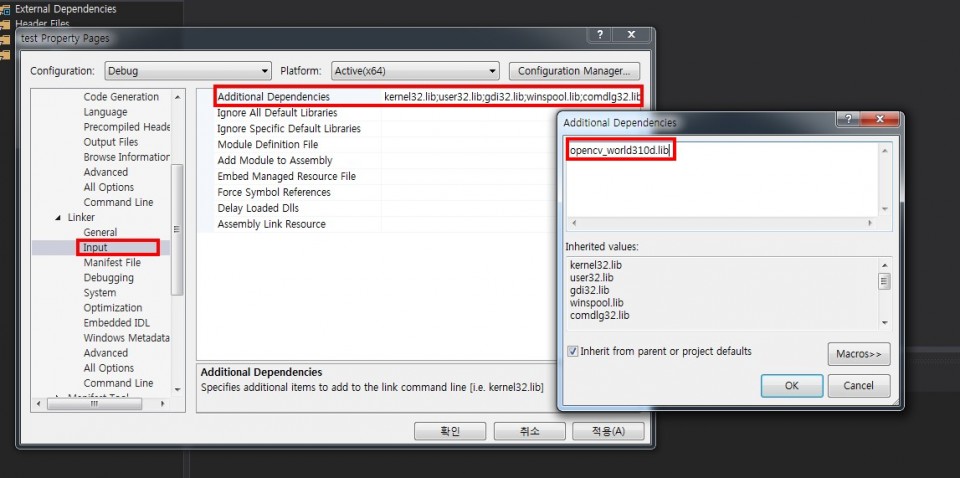
Linker - Input - Additional Dependencies에서 아래를 추가합니다.
opencv_world310d.lib
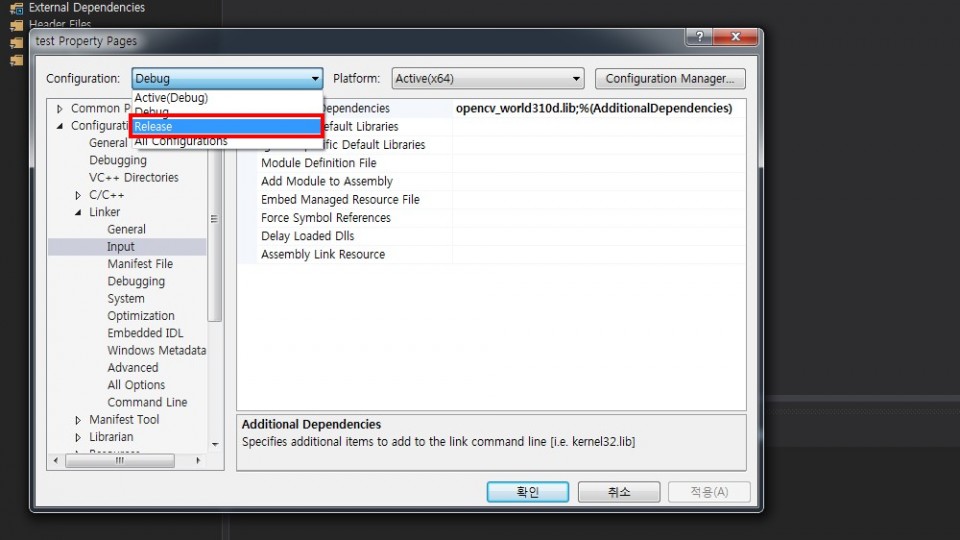
위 작업이 끝났으면 저장 후에 Configuration - Release에서도 똑같이 작업합니다.
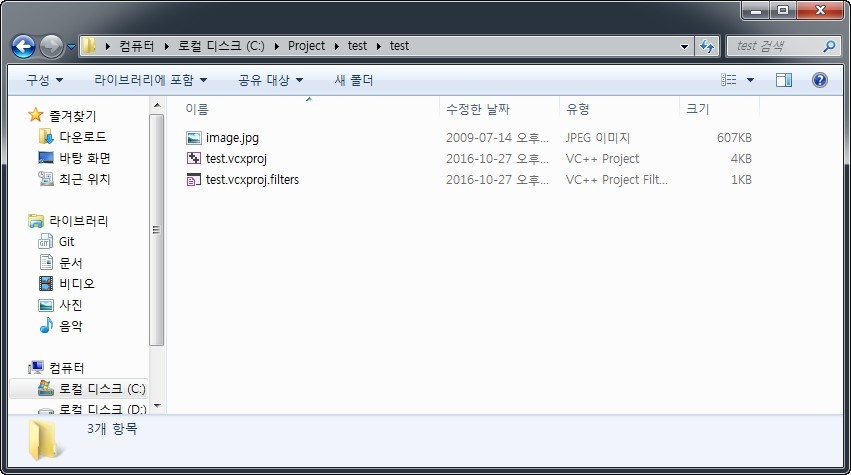
위 작업이 모두 끝났으면 아래 코드를 통해 예제를 실행하여 제대로 설정이 되었는지 확인합니다.
코드 실행에 필요한 사진파일(image.jpg)은 프로젝트 폴더에 넣습니다.
위 코드 실행에 성공하면 사진파일 이미지가 뜨게 됩니다.
Face Detection코드 실행하기
OpenCV의 설치가 끝났으면 이제 얼굴 인식을 위해 FaceDetection코드를 실행합니다.
#include "opencv2/objdetect.hpp"
#include "opencv2/highgui.hpp"
#include "opencv2/imgproc.hpp"
#include <iostream>
#include <stdio.h>
using namespace std;
using namespace cv;
/* Function Headers */
void detectAndDisplay(Mat frame);
/* Global variables */
String face_cascade_name = "haarcascade_frontalface_alt.xml";
String eyes_cascade_name = "haarcascade_eye_tree_eyeglasses.xml";
CascadeClassifier face_cascade;
CascadeClassifier eyes_cascade;
String window_name = "Capture - Face detection";
/* @function main */
int main(void)
{
	VideoCapture capture;
	Mat frame;
	//-- 1. Load the cascades
	if (!face_cascade.load(face_cascade_name)){ printf("--(!)Error loading face cascade\n"); return -1; };
	if (!eyes_cascade.load(eyes_cascade_name)){ printf("--(!)Error loading eyes cascade\n"); return -1; };
	//-- 2. Read the video stream
	capture.open(-1);
	if (!capture.isOpened()) { printf("--(!)Error opening video capture\n"); return -1; }
	while (capture.read(frame))
	{
		if (frame.empty())
		{
			printf(" --(!) No captured frame -- Break!");
			break;
		}
		//-- 3. Apply the classifier to the frame
		detectAndDisplay(frame);
		int c = waitKey(10);
		if ((char)c == 27) { break; } // escape
	}
	return 0;
}
/* @function detectAndDisplay */
void detectAndDisplay(Mat frame)
{
	std::vector<Rect> faces;
	Mat frame_gray;
	cvtColor(frame, frame_gray, COLOR_BGR2GRAY);
	equalizeHist(frame_gray, frame_gray);
	//-- Detect faces
	face_cascade.detectMultiScale(frame_gray, faces, 1.1, 2, 0 | CASCADE_SCALE_IMAGE, Size(30, 30));
	for (size_t i = 0; i < faces.size(); i++)
	{
		Point center(faces[i].x + faces[i].width / 2, faces[i].y + faces[i].height / 2);
		rectangle(frame, Point(faces[i].x, faces[i].y), Point(faces[i].x + faces[i].width, faces[i].y + faces[i].height), Scalar(0, 255, 0), 4, 8, 0);
		Mat faceROI = frame_gray(faces[i]);
		std::vector<Rect> eyes;
		//-- In each face, detect eyes
		eyes_cascade.detectMultiScale(faceROI, eyes, 1.1, 2, 0 | CASCADE_SCALE_IMAGE, Size(30, 30));
		for (size_t j = 0; j < eyes.size(); j++)
		{
			Point eye_center(faces[i].x + eyes[j].x + eyes[j].width / 2, faces[i].y + eyes[j].y + eyes[j].height / 2);
			int radius = cvRound((eyes[j].width + eyes[j].height)*0.25);
			rectangle(frame, Point(faces[i].x + eyes[j].x, faces[i].y + eyes[j].y), Point(faces[i].x + eyes[j].x + eyes[j].width, faces[i].y + eyes[j].y + eyes[j].height), Scalar(255, 0, 0), 4, 8, 0);
		}
	}
	//-- Show what you got
	imshow(window_name, frame);
}
위 코드를 바로 실행하면 코드에서 읽어야 할
String face_cascade_name = "haarcascade_frontalface_alt.xml";
String eyes_cascade_name = "haarcascade_eye_tree_eyeglasses.xml";
위 2개의 파일을 찾을 수 없어 오류가 생기기 때문에 한가지 작업을 더 해주어야 합니다.
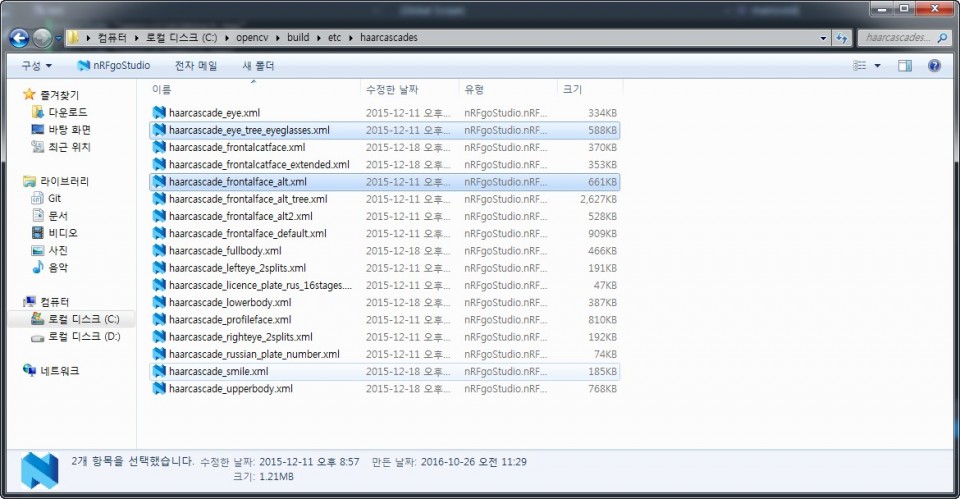
아래 디렉토리(C:\opencv\build\etc\haarcascades)에서
haarcascade_eye_tree_eyeglasses.xml파일과 haarcascade_frontalface_alt.xml파일을 프로젝트 파일로 복사 붙여넣기 합니다.
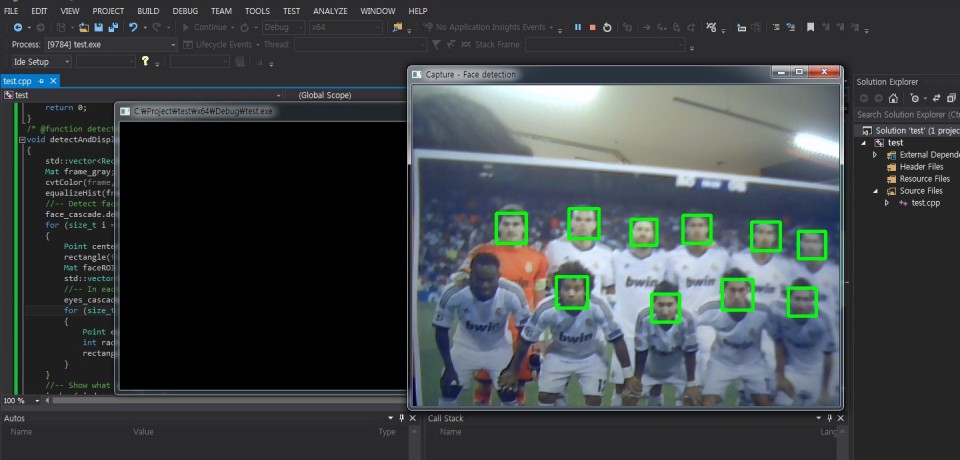
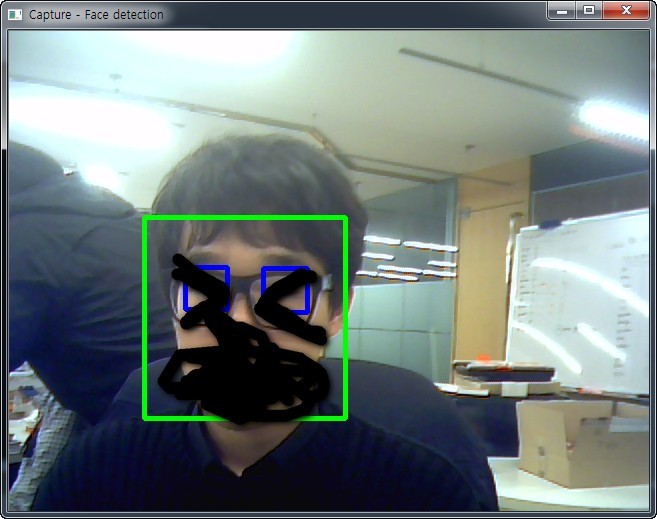
이제 실행할 경우 아래와 같이 정상적으로 사람 얼굴을 인식하는 것을 볼 수 있습니다.
(Webcam으로 촬영하기 때문에 Webcam이나 노트북이 필요합니다.)
아래 사진은 레알마드리드 사진인데 흑형(에시앙 형님)은 인식하지 못하네요;;;;
여기까지 작업이 끝났다면 시리얼 통신으로 아두이노쪽으로 데이터를 전달해 주는 코드를 작성해야 합니다.
이 부분은 시리얼통신을 사용하여 C++로 아두이노 제어하기 - http://kocoafab.cc/tutorial/view/255를 사용하였습니다.
SerialPort.h, SerialPort.cpp, SerialComm.h, SerialComm.cpp 파일은 그대로 사용하시면 되고 main.cpp파일만 작성하시면 됩니다.
main.cpp
#include "opencv2/objdetect.hpp"
#include "opencv2/highgui.hpp"
#include "opencv2/imgproc.hpp"
#include <iostream>
#include <stdio.h>
#include <string>
#include "serialcomm.h"
using namespace std;
using namespace cv;
/* Function Headers */
void detectAndDisplay(Mat frame);
/* Global variables */
String face_cascade_name = "haarcascade_frontalface_alt.xml";
String eyes_cascade_name = "haarcascade_eye_tree_eyeglasses.xml";
CascadeClassifier face_cascade;
CascadeClassifier eyes_cascade;
String window_name = "Capture - Face detection";
CSerialComm serialComm; //SerialComm 객체 생성
char detectStatus = '0';
char temp = '0';
/* @function main */
int main(void)
{
	VideoCapture capture;
	Mat frame;
	char buffer;
	if (!serialComm.connect("COM159")) //COM25번의 포트를 오픈한다. 실패할 경우 -1을 반환한다.
	{
		cout << "connect faliled" << endl;
		return -1;
	}
	else
		cout << "connect successed" << endl;
	//-- 1. Load the cascades
	if (!face_cascade.load(face_cascade_name)){ printf("--(!)Error loading face cascade\n"); return -1; };
	if (!eyes_cascade.load(eyes_cascade_name)){ printf("--(!)Error loading eyes cascade\n"); return -1; };
	//-- 2. Read the video stream
	capture.open(-1);
	if (!capture.isOpened()) { printf("--(!)Error opening video capture\n"); return -1; }
	while (capture.read(frame))
	{
		if (frame.empty())
		{
			printf(" --(!) No captured frame -- Break!");
			break;
		}
		//-- 3. Apply the classifier to the frame
		detectAndDisplay(frame);

		int c = waitKey(10);
		if ((char)c == 27) { break; } // escape
	}
	return 0;
}
/* @function detectAndDisplay */
void detectAndDisplay(Mat frame)
{
	std::vector<Rect> faces;
	Mat frame_gray;
	cvtColor(frame, frame_gray, COLOR_BGR2GRAY);
	equalizeHist(frame_gray, frame_gray);
	//-- Detect faces
	face_cascade.detectMultiScale(frame_gray, faces, 1.1, 2, 0 | CASCADE_SCALE_IMAGE, Size(30, 30));
	if (faces.size() > 0){

		detectStatus = '1';
		if (temp == '0') {
			cout << "detect!!" << endl;
			serialComm.sendCommand('1');
			temp = '1';
		}
	}
	else {
		detectStatus = '0';
		if (temp == '1') {
			cout << "Unknown" << endl;
			serialComm.sendCommand('0');
			temp = '0';
		}
	}
	for (size_t i = 0; i < faces.size(); i++)
	{
		Point center(faces[i].x + faces[i].width / 2, faces[i].y + faces[i].height / 2);
		//ellipse(frame, center, Size(faces[i].width / 2, faces[i].height / 2), 0, 0, 360, Scalar(255, 0, 255), 4, 8, 0);
		rectangle(frame, Point(faces[i].x, faces[i].y), Point(faces[i].x + faces[i].width, faces[i].y + faces[i].height), Scalar(0, 255, 0), 4, 8, 0);
		Mat faceROI = frame_gray(faces[i]);
		std::vector<Rect> eyes;
		//-- In each face, detect eyes
		eyes_cascade.detectMultiScale(faceROI, eyes, 1.1, 2, 0 | CASCADE_SCALE_IMAGE, Size(30, 30));
		for (size_t j = 0; j < eyes.size(); j++)
		{
			Point eye_center(faces[i].x + eyes[j].x + eyes[j].width / 2, faces[i].y + eyes[j].y + eyes[j].height / 2);
			int radius = cvRound((eyes[j].width + eyes[j].height)*0.25);
			//circle(frame, eye_center, radius, Scalar(255, 0, 0), 4, 8, 0);
			rectangle(frame, Point(faces[i].x + eyes[j].x, faces[i].y + eyes[j].y), Point(faces[i].x + eyes[j].x + eyes[j].width, faces[i].y + eyes[j].y + eyes[j].height), Scalar(255, 0, 0), 4, 8, 0);
		}

	}
	//-- Show what you got
	imshow(window_name, frame);
}
main 코드에서 시리얼 통신으로 값을 전달해 주는 부분은 아래 부분이며 그 외에는 face Detection예제와 거의 유사합니다. faceDetection예제에 시리얼 통신을 위한 main파일 내용을 더 추가한 코드입니다.
코드에서는 얼굴을 인식할 경우 faces.size()가 0보다 커지는 것을 이용하여 현재 CAM으로 얼굴을 인식하고 있는지를 판별합니다.
인식하고 있을 경우에는 1을 아두이노로 전송하고, 아닐 경우에는 0을 전송합니다.
	if (faces.size() > 0){

		detectStatus = '1';
		if (temp == '0') {
			cout << "detect!!" << endl;
			serialComm.sendCommand('1');
			temp = '1';
		}
	}
	else {
		detectStatus = '0';
		if (temp == '1') {
			cout << "Unknown" << endl;
			serialComm.sendCommand('0');
			temp = '0';
		}
	}
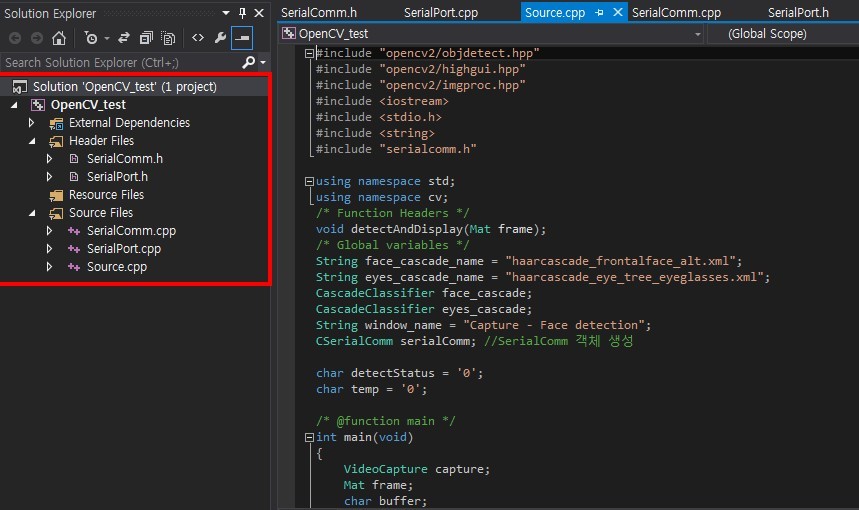
총 Visual Studio의 파일을 정리하면 아래와 같이 header파일2개와 cpp파일3개를 사용하게 됩니다.
아두이노 코드
아두이노 코드는 아래와 같습니다.
간단하게 시리얼통신으로 1과 0의 값을 받아 LED를 켜고 끄게 됩니다.
int ledPin = ledPin;
char c;

void setup() {
  // put your setup code here, to run once:
  Serial.begin(9600);
  pinMode(ledPin,OUTPUT);
}

void loop() {
  // put your main code here, to run repeatedly:
    if (Serial.available()) {
    c = Serial.read();
    if(c =='1') {
      digitalWrite(ledPin,HIGH);
    }
    else if(c =='0') {
      digitalWrite(ledPin,LOW);
    }
  }
}
위 아두이노 코드를 업로드 하고 c++코드를 실행해 얼굴을 인식하면 LED에 불이 들어오고 얼굴이 인식되지 않으면 LED에 불이 꺼집니다.
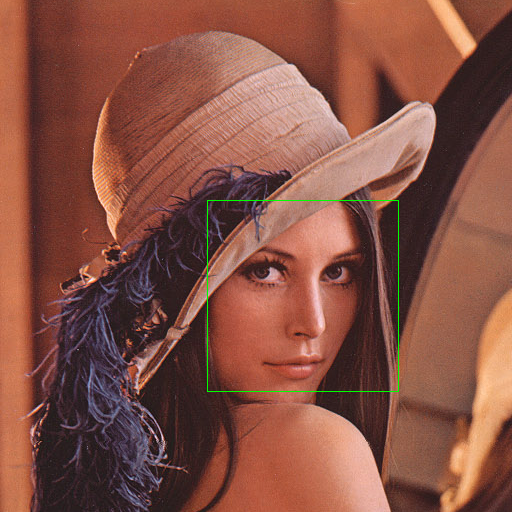
코드에서 haarcascade_frontalface_alt.xml과 haarcascade_eye_tree_eyeglasses.xml를 사용하기 때문에 사진과 같이 앞 얼굴과 눈 모두 인식합니다.


수박쨈
 arduino, 아두이노, OpenCV, 영상처리, 얼굴 인식, FaceDetection
