
색상 분류 제어 로봇팔 만들기
2019-11-05 09:13:33
칼라 센서란?
색은 물체의 표면에 파장이 다른 빛이 반사하는 정도에 따라 시각계통에서 감지하는 성질의 차이 때문에 나타나는 감각적 특성입니다.
칼라 센서는 CCD를 이용해 빛을 전하로 변환시켜 물체의 색상을 감지 할 수 있는 센서를 말합니다.
(* Charge Coupled Device(CCD) 는 빛을 노출시키면 이미지를 전기적인 형태로 전송하는 소자)
칼라 센서를 통해 인식된 색상은 R, G, B 값으로 각각 구별되어 측정됩니다.
칼라 센서 사용방법
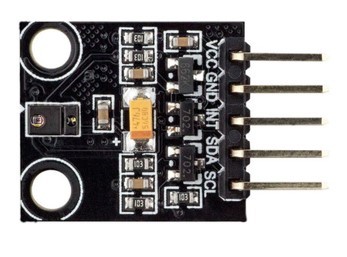
이번에 사용할 센서는 Sparkfun APDS-9960 모델로 RGB 및 제스처 센서 모듈입니다.
(* 제스처 인식 프로젝트(https://kocoafab.cc/make/view/788) 에 사용한 센서와 같은 센서입니다.)
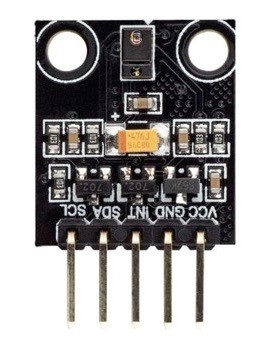
APDS-9960는 내부에 UV 및 IR, 서로 다른방향으로 4개의 다이오드가 장착되어 있습니다.
이를 이용해서 아래의 기능을 사용할 수 있습니다.
1. 제스처 인식
2. 주변환경의 밝기 측정 - 근접 센서
3. 주변환경의 색을 측정 - 칼라 센서
이번 가이드에서는 위 기능 중 3번 칼라 인식 기능을 사용하겠습니다.
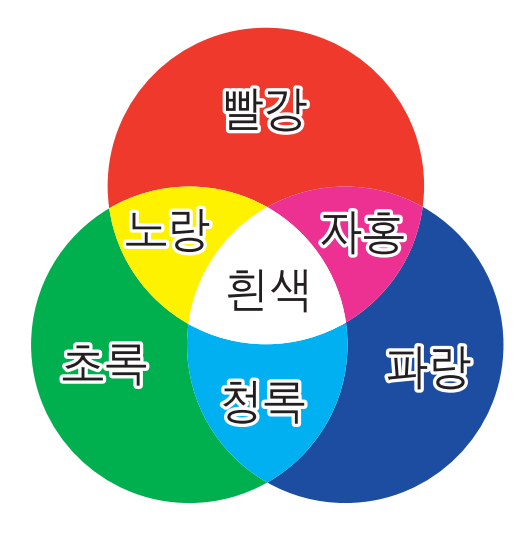
칼라 센서로 인식된 결과는 빛의 3원색인 빨강, 초록, 파랑 3가지 값으로 표현합니다.
칼라 인식은 측정 대상 주변에 빛이 있어야 측정이 잘되니 측정 대상 주변을 라이트로 비쳐주세요.
칼라 인식은 아래 이미지에 있는 센서 윗부분에서 측정을 합니다.
부품 목록
| NO | 부품명 | 수량 | 상세설명 |
| 1 | 오렌지보드 + 확장보드 | 1 | |
| 2 | 칼라 센서 | 1 | APDS-9960 |
| 3 | 점퍼 케이블 | 5 |
| 부품명 | 오렌지보드 + 확장보드 | 칼라 센서 | 점퍼 케이블 |
| 파트 | 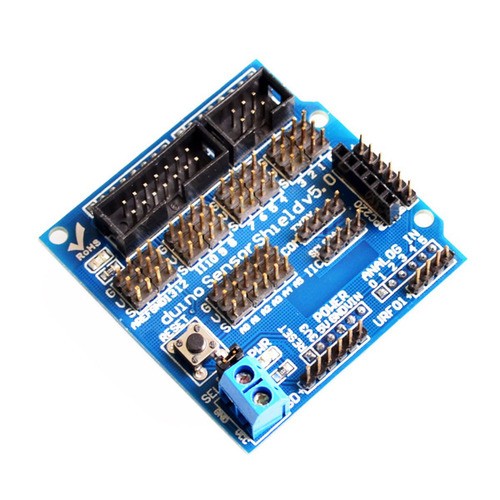 |
 |
 |
하드웨어 making
* 제스쳐 센서 같은 센서임으로 제스쳐 센서 컨텐츠에서 연결하신분은 그대로 사용하시면 됩니다.
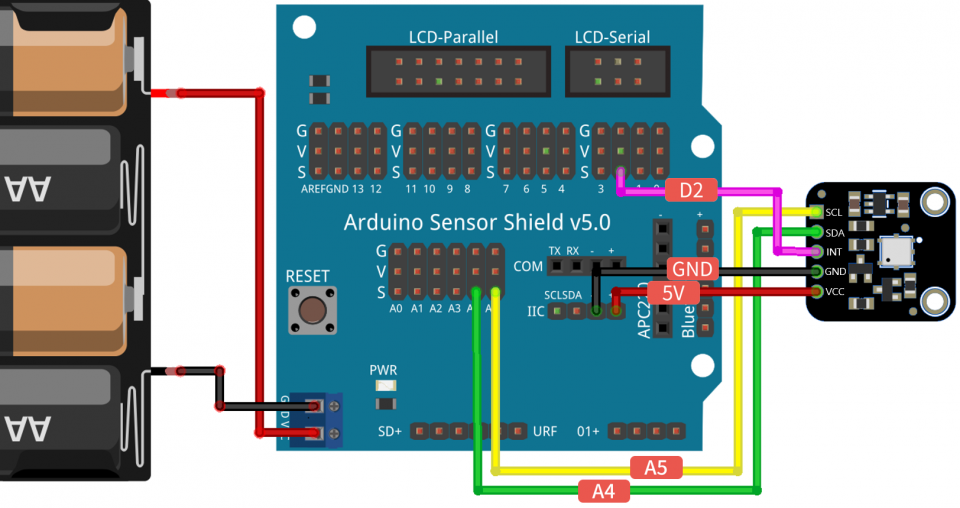
1. 칼라 센서의 SCL핀을 오렌지보드 확장실드 A5에 연결합니다.
2. 칼라 센서의 SDA핀을 오렌지보드 확장실드 A4에 연결합니다.
3. 칼라센서의 INT핀을 오렌지보드 확장실드 D2에 연결합니다.
4. 칼라센서의 GND핀을 오렌지보드 확장실드 GND에 연결합니다.
5. 칼라 센서의 VCC핀을 오렌지보드 확장실드 3.3V에 연결합니다.
소프트웨어 coding
|
1
2
3
4
5
6
7
8
9
10
11
12
13
14
15
16
17
18
19
20
21
22
23
24
25
26
27
28
29
30
31
32
33
34
35
36
37
38
39
40
41
42
43
44
45
46
47
48
49
50
|
#include <Wire.h>
#include <SparkFun_APDS9960.h>
SparkFun_APDS9960 apds = SparkFun_APDS9960();
uint16_t ambient_light = 0;
uint16_t red_light = 0;
uint16_t green_light = 0;
uint16_t blue_light = 0;
void setup() {
Serial.begin(9600);
Serial.println();
Serial.println(F("--------------------------------"));
Serial.println(F("SparkFun APDS-9960 - ColorSensor"));
Serial.println(F("--------------------------------"));
if ( apds.init() ) {
Serial.println(F("APDS-9960 initialization complete"));
} else {
Serial.println(F("Something went wrong during APDS-9960 init!"));
}
if ( apds.enableLightSensor(false) ) {
Serial.println(F("Light sensor is now running"));
} else {
Serial.println(F("Something went wrong during light sensor init!"));
}
delay(500);
}
void loop() {
if ( !apds.readAmbientLight(ambient_light) ||
!apds.readRedLight(red_light) ||
!apds.readGreenLight(green_light) ||
!apds.readBlueLight(blue_light) ) {
Serial.println("Error reading light values");
} else {
Serial.print("Ambient: ");
Serial.print(ambient_light);
Serial.print(" Red: ");
Serial.print(red_light);
Serial.print(" Green: ");
Serial.print(green_light);
Serial.print(" Blue: ");
Serial.println(blue_light);
}
delay(1000);
}
|
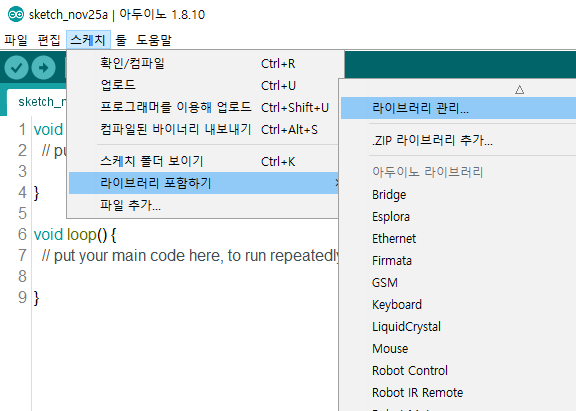
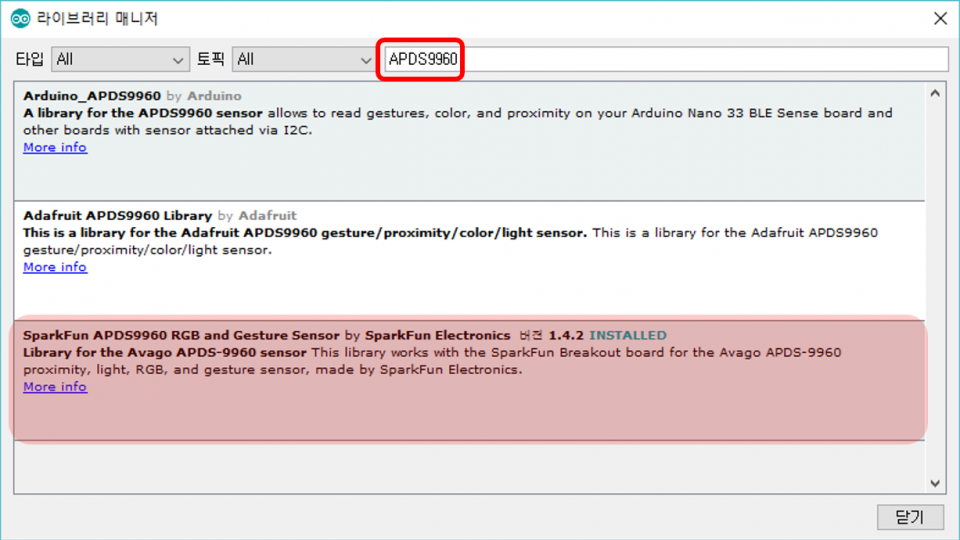
TIP 위 예제코드를 사용하기 위해서는 SparkFun_APDS9960 라이브러리가 필요합니다. 이 라이브러리는 외부 라이브러리이기 때문에 라이브러리 추가 작업을 진행해야 합니다. 아래 사진을 참고하여 라이브러리를 추가한후 코드를 업로드하세요.
* 앞서 사용한 제스쳐 센서 라이브러리와 동일합니다.
라이브러리를 설치 후 위 소스 코드를 업로드하신후 시리얼 모니터를 열어보시면 센서에서 측정된 색상값이 아래 사진과 같이 시리얼 모니터에 표현해줍니다.

소프트웨어 설명
|
1
2
3
4
5
6
|
if ( !apds.readAmbientLight(ambient_light) ||
!apds.readRedLight(red_light) ||
!apds.readGreenLight(green_light) ||
!apds.readBlueLight(blue_light) ) {
Serial.println("Error reading light values");
}
|
readAmbientLight(주변광 변수) / readRedLight(빨간색 변수) / readGreenLight(초록색 변수) / readBlueLight(파란색 변수)
위 함수들은 각각의 값을 센서로부터 받아와서 괄호안에 변수에 넣어주는 함수입니다. 값을 읽어오지 못하면 -1을 리턴합니다.
EX : readReadLight(red_light) 함수를 사용하면 red_light 에 센서에 인식된 색상 중 빨간색 값을 red_light변수에 넣어줍니다.
색상 분류 제어 로봇팔 만들기
센서 앞 물체의 색상을 인식하여 색상별로 정해진 위치에 옮길 수 있습니다.
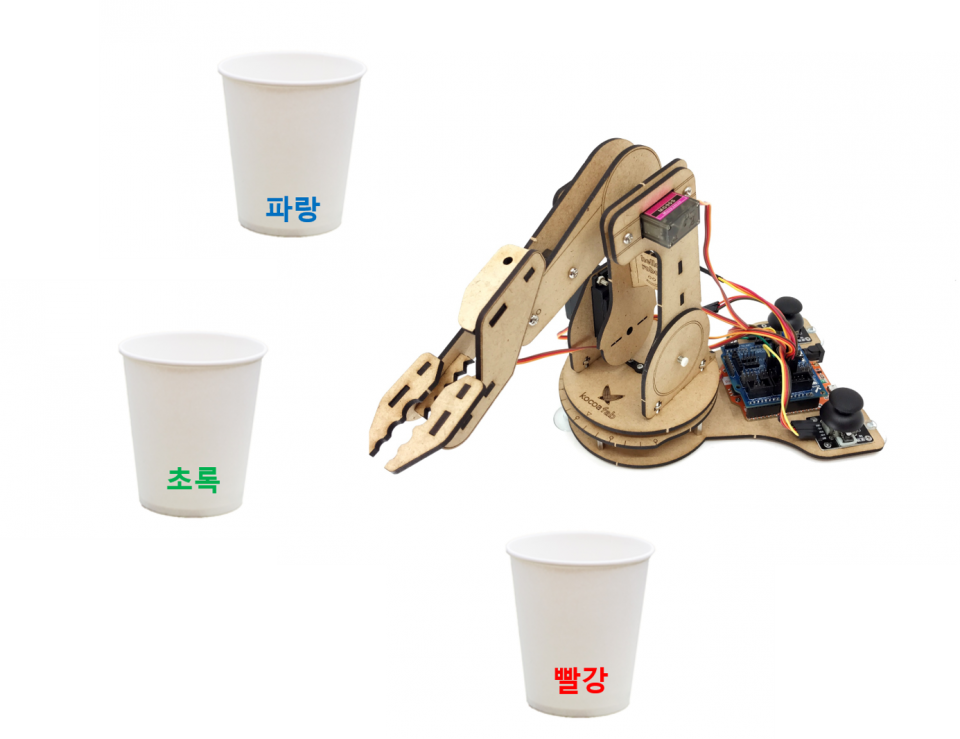
칼라 센서앞에 물체가 인식되면 물체의 색깔이 빨간색이면 빨간색 종이컵에 초록색은 초록색 종이컵에 파란색은 파란색 종이컵에 넣는 로봇팔을 만들어 보겠습니다.
소프트웨어 코딩
|
1
2
3
4
5
6
7
8
9
10
11
12
13
14
15
16
17
18
19
20
21
22
23
24
25
26
27
28
29
30
31
32
33
34
35
36
37
38
39
40
41
42
43
44
45
46
47
48
49
50
51
52
53
54
55
56
57
58
59
60
61
62
63
64
65
66
67
68
69
70
71
72
73
74
75
76
77
78
79
80
81
82
83
84
85
86
87
88
89
90
91
92
93
94
95
96
97
98
99
100
101
102
103
104
105
106
107
108
109
110
111
112
113
114
115
116
117
118
119
120
121
122
123
124
125
126
127
128
129
130
131
132
133
134
135
136
137
138
139
140
141
142
143
144
145
146
147
148
149
150
151
152
153
154
155
156
|
#include <Wire.h>
#include <SparkFun_APDS9960.h>
#include <Servo.h>
SparkFun_APDS9960 apds = SparkFun_APDS9960();
uint16_t ambient_light = 0;
uint16_t red_light = 0;
uint16_t green_light = 0;
uint16_t blue_light = 0;
uint8_t proximity_data = 0;
Servo bottom;
Servo arm1;
Servo arm2;
Servo grip;
void setup() {
Serial.begin(9600);
bottom.attach(8);
arm1.attach(9);
arm2.attach(10);
grip.attach(11);
if ( apds.init() ) {
Serial.println(F("APDS-9960 initialization complete"));
} else {
Serial.println(F("Something went wrong during APDS-9960 init!"));
}
if ( apds.enableProximitySensor(false) ) {
Serial.println(F("Proximity sensor is now running"));
} else {
Serial.println(F("Something went wrong during sensor init!"));
}
if ( apds.enableLightSensor(false) ) {
Serial.println(F("Light sensor is now running"));
} else {
Serial.println(F("Something went wrong during light sensor init!"));
}
delay(500);
bottom.write(120);
arm1.write(85);
arm2.write(140);
grip.write(140);
}
void loop() {
if ( !apds.readProximity(proximity_data) ) {
Serial.println("Error reading proximity value");
} else {
Serial.print("Proximity: ");
Serial.println(proximity_data);
if (proximity_data > 250) {
byte result = colorTest();
Serial.print("RESULT = ");
Serial.println(result);
if (result > 0) {
servoMove(result);
}
}
}
delay(500);
}
byte colorTest() {
byte color = 0;
if ( !apds.readAmbientLight(ambient_light) ||
!apds.readRedLight(red_light) ||
!apds.readGreenLight(green_light) ||
!apds.readBlueLight(blue_light) ) {
Serial.println("Error reading light values");
}
else {
Serial.print("Ambient: ");
Serial.print(ambient_light);
Serial.print(" Red: ");
Serial.print(red_light);
Serial.print(" Green: ");
Serial.print(green_light);
Serial.print(" Blue: ");
Serial.println(blue_light);
// 빨간색 물체
if (red_light > green_light && red_light > blue_light && red_light > 100) {
color = 1;
}
// 초록색 물체
if (green_light > red_light && green_light > blue_light && green_light > 100) {
color = 2;
}
// 파란색 물체
if (blue_light > red_light && blue_light > green_light && blue_light > 100) {
color = 3;
}
}
return color;
}
void servoMove(byte color) {
arm1.write(130);
delay(1000);
grip.write(90);
delay(2000);
arm1.write(85);
delay(2000);
if (color == 1) {
bottom.write(180);
delay(2000);
arm1.write(130);
delay(2000);
grip.write(140);
delay(2000);
}
else if (color == 2) {
bottom.write(70);
delay(2000);
arm1.write(130);
delay(2000);
grip.write(140);
delay(2000);
}
else if (color == 3) {
bottom.write(10);
delay(2000);
arm1.write(130);
delay(2000);
grip.write(140);
delay(2000);
}
arm1.write(85);
delay(2000);
bottom.write(120);
arm1.write(85);
arm2.write(140);
grip.write(140);
delay(500);
}
|
소프트웨어 설명
|
1
2
3
4
5
6
7
8
9
10
11
12
13
14
|
// 빨간색 물체
if (red_light > green_light && red_light > blue_light && red_light > 100) {
color = 1;
}
// 초록색 물체
if (green_light > red_light && green_light > blue_light && green_light > 100) {
color = 2;
}
// 파란색 물체
if (blue_light > red_light && blue_light > green_light && blue_light > 100) {
color = 3;
}
|
센서로부터 각각 R, G, B 값을 받은 후 각 값을 비교하여 제일 높은 수치를 가지는 값을 찾는 부분입니다.
(값이 너무 낮을 경우 정확도가 떨어져서 값이 100 이상일 때만 비교하도록 하였습니다.)
예를 들어 R이 600, G가 300, B가 200 일 경우
1번 if문 (600 > 300 && 600 && 200 && 600 > 100) -> 참
2번 if문 (300 > 600 && 300 > 200 && 300 > 100) -> 거짓(300 > 600 : X)
3번 if문 (200 > 600 && 200 > 300 && 200 > 100) -> 거짓(200 > 300, 200 > 600 : X)
가 되서 1번 if문만 동작하게 됩니다.(해당 물체는 빨간색으로 인식)
|
1
2
3
4
5
6
7
8
9
10
11
12
13
14
15
16
17
18
19
20
21
22
23
24
25
26
27
28
29
30
31
32
33
34
35
36
37
38
39
40
41
42
43
44
45
|
void servoMove(byte color) {
arm1.write(130);
delay(1000);
grip.write(90);
delay(2000);
arm1.write(85);
delay(2000);
if (color == 1) {
bottom.write(180);
delay(2000);
arm1.write(130);
delay(2000);
grip.write(140);
delay(2000);
}
else if (color == 2) {
bottom.write(70);
delay(2000);
arm1.write(130);
delay(2000);
grip.write(140);
delay(2000);
}
else if (color == 3) {
bottom.write(10);
delay(2000);
arm1.write(130);
delay(2000);
grip.write(140);
delay(2000);
}
arm1.write(85);
delay(2000);
bottom.write(120);
arm1.write(85);
arm2.write(140);
grip.write(140);
delay(500);
}
|
위에서 인식한 색상별로 사용자가 지정한 각도대로 움직이게 하는 코드입니다.
위 코드는 약간의 노가다를 이용하여 원하는 위치의 각도를 확인하신 다음 해당 각도로 움직이게 하는 코드입니다.
공통 동작은 조건문 없이 따로 빼놓았고 각 색상별로 구별되야 하는 동작(모터1의 각도)만 조건문을 통해 color 변수값에 따라 정해지도록 합니다.
(color가 1이면 빨강, 2면 녹색, 3이면 파랑색입니다.)


kocoafab

